Welcome to the second part in our tutorial for getting started with Flask development on PythonAnywhere! This is a continuation of our previous tutorial, so if you haven’t been through it, you should do that first. In particular, this tutorial will assume that you’re starting with the code that you had at the end of the last one: a simple website that allowed you to post comments on a page, all of those comments being stored in a database:
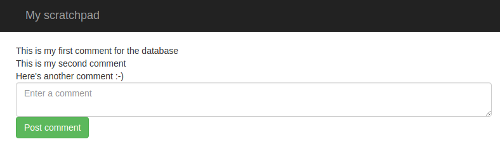
It was made up of two files; a Python file which controlled what it did, and a template file that controlled how it was displayed. All of our code was under source-code control, and it was running as a website on PythonAnywhere.
Obviously this was a rather limited website! It would be nice if we could add some features – and in this tutorial, that’s exactly what we’ll do. Our original site used the slightly ugly password protection built in to PythonAnywhere; this means that in order for people to post on it, they had to enter a username and password – but it was the same username and password for everyone, which isn’t terribly secure. We’re going to add our own login page – which means that we can also store a record of who posted what, and when.
Here’s what it will look like:

Adding these new features will require us to do a bit of work in the background; our existing site works fine for what it is, but it’s not very extensible, and we’ll fix that as we go. You’ll learn about the Flask-Login extension, database migrations, and virtualenvs – all very useful stuff.
Let’s get started!
Handling login and logout: the basics
Just like we did before, we’ll start off by designing how the site should look. We already have a page that lists all of the comments, and allows people to add new comments. But we don’t have a login page, so let’s start by writing one. Log in to PythonAnywhere, then go to the “Files” page near the top right, and then down into the “mysite” directory that contains your code, and then to the “templates” subdirectory. Enter the filename “login_page.html” into the “new file” input, then click the “new file” button. You’ll find yourself in the (hopefully very familiar) editor, where you should enter the following HTML template code:
<html>
    <head>
        <meta charset="utf-8">
        <meta http-equiv="X-UA-Compatible" content="IE=edge">
        <meta name="viewport" content="width=device-width, initial-scale=1">

        <link rel="stylesheet" href="https://maxcdn.bootstrapcdn.com/bootstrap/3.3.5/css/bootstrap.min.css" integrity="sha512-dTfge/zgoMYpP7QbHy4gWMEGsbsdZeCXz7irItjcC3sPUFtf0kuFbDz/ixG7ArTxmDjLXDmezHubeNikyKGVyQ==" crossorigin="anonymous">

        <title>My scratchboard page: log in</title>
    </head>

    <body>
        <nav class="navbar navbar-inverse">
            <div class="container">
                <div class="navbar-header">
                    <button type="button" class="navbar-toggle collapsed" data-toggle="collapse" data-target="#navbar" aria-expanded="false" aria-controls="navbar">
                        <span class="sr-only">Toggle navigation</span>
                        <span class="icon-bar"></span>
                        <span class="icon-bar"></span>
                        <span class="icon-bar"></span>
                    </button>
                    <a class="navbar-brand" href="#">My scratchpad: login page</a>
                </div>
            </div>
        </nav>

        <div class="container">

            <div class="row">
                <form action="." method="POST">
                  <div class="form-group">
                    <label for="username">Username:</label>
                    <input class="form-control" id="username" name="username" placeholder="Enter your username">
                  </div>
                  <div class="form-group">
                    <label for="password">Password:</label>
                    <input type="password" class="form-control" id="password" name="password" placeholder="Enter your password">
                  </div>
                  <button type="submit" class="btn btn-success">Log in</button>
                </form>
            </div>

        </div>

    </body>
</html>
This should be pretty clear – like the template from the first part of the tutorial, most of it is boilerplate to make it look similar to the
existing front page, and the form inside
the row (inside the container inside the body)
is a simple login form with username and password fields, each of which has a label, and a “Log in” button to submit the form.
Note that the type of the password field is “password” –
this is to do the normal trick of making it display asterisks when people type into it.
So, we have an HTML template that will display our login page. Let’s add some basic Flask code to display it so that we can
see how it looks. Keep the
browser tab showing the template file open – we’ll come back to it in a bit – and right-click on “mysite” in the breadcrumbs
near the top of the page, and select the option to open it in a new browser tab. Go to that tab, then click on the
flask_app.py file, which contains your Python code. At the end of the file, add a new view like this:
@app.route("/login/")
def login():
    return render_template("login_page.html")
Save the file, then reload the website using the button at the top right of the page – in case you’ve forgotten, it looks like this:

Once that’s done, go to your site in yet another browser tab – remember, it’s at yourpythonanywhereusername.pythonanywhere.com.
You should now have three tabs open – the template, the Python code, and your site.
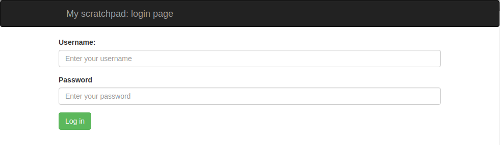
On your site, you’ll see what you did before – the page with the list of comments. So next, edit the URL in the browser’s address bar and add “/login/” to the end. Hit return, and we get the login page:
So far, so good! But if you enter a username and a password into the form, you’ll get a “Method not allowed” error:
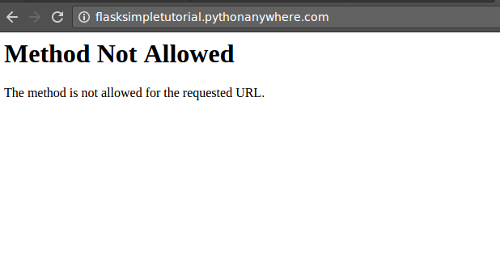
Hopefully that will be
familiar from the first tutorial; our form is sending a POST request when the “Log in” button is clicked, and our
view doesn’t handle that method yet.
We’ve reached a state where our site is doing something new, so let’s use git to take a checkpoint. In yet another new browser tab, go to the dashboard, click on “Consoles” near the top right, and open up a new Bash console.
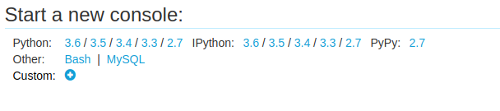
(If you’re using a free account and you have two consoles open from going through the tutorial previously, won’t be able to open a new one, so you should close the old ones using the “X"s next to their names, so that you can start with a completely fresh console.)
In the new console, change your working directory to mysite, which is where all of our code is, by running this command:
cd mysite
…then run “git status” to see the changes:
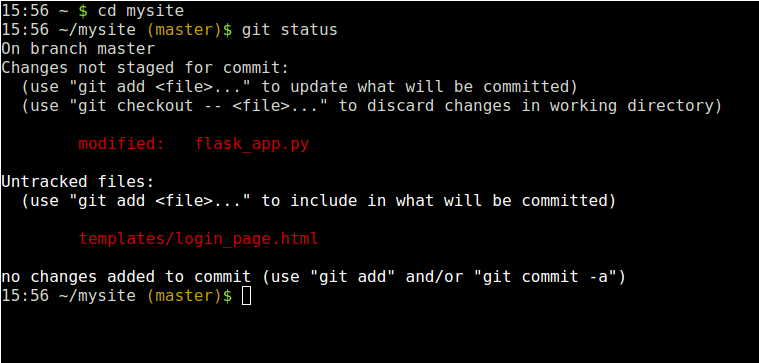
We have a new template file, which we need to add to the git repository:
git add templates/login_page.html
…and some changes to flask_app.py; run this to see them:
git diff
….then this to add them to the list of changes to commit.
git add flask_app.py
And now we’ve added the files, we commit those changes – remember, this is to batch everything together to make a coherent single change:
git commit -m"First cut at the login page"
Right, let’s add the basics of the login functionality. Initially, we won’t actually distinguish between logged-in
and non-logged-in users on the main page; we’ll just change our new login page page so that if someone enters the username “admin” and the password
“secret”, they get sent back to the front page – but if they enter anything else, they’ll get sent back to the login
page, and shown an error message saying that the credentials were incorrect. Change the login view so that it looks like this:
@app.route("/login/", methods=["GET", "POST"])
def login():
    if request.method == "GET":
        return render_template("login_page.html", error=False)

    if request.form["username"] != "admin" or request.form["password"] != "secret":
        return render_template("login_page.html", error=True)

    return redirect(url_for('index'))
Let’s break that down:
@app.route("/login/", methods=["GET", "POST"])
Just like last time around, we need to tell the view that as well as handling simple viewing of the page (requests using the “GET” method), it should handle submitted form data (requests using the “POST” method). This solves the “Method not allowed” error when data is POSTed.
    if request.method == "GET":
        return render_template("login_page.html", error=False)
If the browser is just visiting the page normally, we render the login page passing a variable called error in,
setting that variable to False.
    if request.form["username"] != "admin" or request.form["password"] != "secret":
        return render_template("login_page.html", error=True)
Because we got past the first step in the function, we now know that this request is the result of someone
trying to log in, a POST request. If either the username they specified isn’t “admin”, or the password isn’t “secret”,
we render the login page again, but this time we set the error variable to True.
return redirect(url_for('index'))
Otherwise, it was a valid login, so we just send them back to the index page – the main page of the app.
Before we try this out, head back to the tab you kept open with the login page template in it, and add this just before the form:
{% if error %}
    <div class="alert alert-warning" role="alert">
        Incorrect username or password
    </div>
{% endif %}
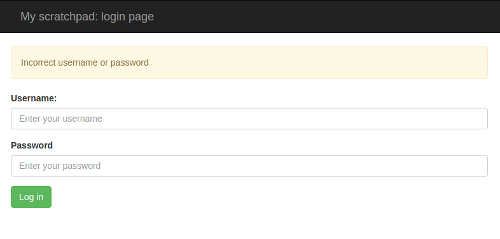
Reload the website using the button at top right in the editor, then visit the login page again. Try entering an incorrect username and password, and click the “Log in” button – you’ll be taken back to the login page, with a yellow warning at the top:
Now try logging in with the username “admin” and the password “secret”: you’ll be taken to the main front page.
Even though we’re not actually really logging in to anything, that’s actually quite a big step forward: now we have a login page that is checking credentials, which gives us the beginnings of some security. Let’s get that committed: go to the tab where you have the bash console running, and use “git status”, “git diff”, “git add” and “git commit” to make sure that then changes – both in the template and in the Python code – are stored away.
Doing something with login and logout
So, the next step is to actually change the behaviour of the site based on whether the user is logged in or not. After all, that’s what logging into something is actually meant to do! We’ll allow people who are not logged in to see the site, but not change it. Only people who are logged in will be able to leave comments.
For this, we’re going to use an extension to the Flask web framework called “Flask-Login”. Like Flask-Sqlalchemy, which you’ll remember we’re using to talk to the database, Flask-Login is not part of Flask itself, but provides useful functionality that many sites find useful. Conveniently enough, it is already installed on PythonAnywhere, so we can just use it without having to install anything.
Go to the browser tab where you have the flask_app.py file open, and add an import line like this after the
one for flask_sqlalchemy:
from flask_login import login_user, LoginManager, UserMixin
This will tell Python which bits of Flask-Login we need to use. Note that although the name of the extension is Flask-Login with a dash, the thing you import from uses an underscore – this is because Python treats dashes as minus signs for arithmetic, so you can’t put them inside identifiers.
Next, just after the line that we already have where we set up the database, which looks like this:
db = SQLAlchemy(app)
…add three lines to set up the login system:
app.secret_key = "something only you know"
login_manager = LoginManager()
login_manager.init_app(app)
The first of those lines is a placeholder – you should replace the words “something only you know” with a reasonably long (say, 20 characters) completely random string (letting a cat walk across the keyboard works well, but if you don’t have a cat handy, just hammer randomly on some keys). This is because Flask-Login is going to use some of the cryptographic components of Flask, and those need to have a secret key to operate. The next two lines just create an instance of the Flask-Login system and associate it with your Flask app.
So now we’ve imported and are using the login system; the next step is to tell it about some users.
The first thing is to define a Python class to describe what users look like; we’ll have an instance of this
for each user. Add it just before the Comment class.
class User(UserMixin):

    def __init__(self, username, password_hash):
        self.username = username
        self.password_hash = password_hash


    def check_password(self, password):
        return check_password_hash(self.password_hash, password)


    def get_id(self):
        return self.username
This class is a subclass of UserMixin, which is provided by Flask-Login. This is because the extension is
very flexible, and allows you to set things up in all kinds of weird and interesting ways, with all kinds of weird
and interesting definitions of “user” – but if all you want is the sane, normal concept of a “user” that
most websites have, it provides the UserMixin class to inherit
sensible behaviour from.
We specify that our users have usernames and password hashes, which are passed in to our
__init__ method and stored on the object, we have a check_password method that, given a password entered by someone
when they are logging in, returns True if it’s the right one for the user, and False if not, and we have a
get_id method, which Flask-Login requires to return a unique identifier for the user – we just use the username.
There’s something that’s well worth drawing your attention to in that last bit; the “password hash” stuff, as opposed to a simple “password”. Storing passwords in plain text is a really bad idea; if a hacker gets in to your system, they get a list of usernames and passwords. If those username/password combinations are used on other sites, the users are in trouble.
Without going into too much detail, what we do is “hash” and “salt” the passwords, which means that the passwords
themselves aren’t going to be stored in
the User objects – instead, a cryptographic string that pretty-much uniquely identifies the password will be.
For more details, here’s
an excellent article from the Guardian on hashing and salting.
Having added that, we need to import the hash functions, plus another one that we’re about to use, by adding this line
just after the imports from flask_login:
from werkzeug.security import check_password_hash, generate_password_hash
Now, let’s specify a couple of users. Normally
a website would keep its list of users in the database – and we’ll change things to do that later – but for
now, we’ll just keep them in our code. Add this just after the User class:
all_users = {
    "admin": User("admin", generate_password_hash("secret")),
    "bob": User("bob", generate_password_hash("less-secret")),
    "caroline": User("caroline", generate_password_hash("completely-secret")),
}
(Of course, having done all of that clever stuff so that we don’t have the passwords in plaintext, we’re now adding code with… the passwords in plaintext. Don’t worry – that’s going to change by the end of this tutorial!)
So that’s a dictonary that maps from the username to the user object for three users. Why a dictionary rather
than a simple list? It’s because Flask-Login needs to be provided with a function that, given a unique ID
(as returned by the get_id method on a User object) returns the associated User object; for example, we need
to provide a function that when given the string "bob" will return the second User object defined in the code
we just added. Python’s dictionary class is ideal for that, so let’s add the function, just after the dictionary:
@login_manager.user_loader
def load_user(user_id):
    return all_users.get(user_id)
Now we’ve set things up so that Flask-Login is properly configured, so let’s use it. Change the login
view so that it looks like this:
@app.route("/login/", methods=["GET", "POST"])
def login():
    if request.method == "GET":
        return render_template("login_page.html", error=False)

    username = request.form["username"]
    if username not in all_users:
        return render_template("login_page.html", error=True)
    user = all_users[username]

    if not user.check_password(request.form["password"]):
        return render_template("login_page.html", error=True)

    login_user(user)
    return redirect(url_for('index'))
So now – if it’s not a “GET” request – we check whether the login attempt is for a known user, and if it isn’t,
we dump them back on the login page
with an error. If it is a real user, we check the password, and if it’s wrong, we also error out. Finally,
if it’s a real user, we call Flask-Login’s login_user function to stash away the fact that they’re successfully
logged in, and we send them back to the front page.
Before we fully make use of this, let’s check whether it works at least well enough to check things against our current list of users. Reload the site using the button to the top right of the editor, then visit the login URL again. Enter an invalid username/password; you’ll get a login error. Now try logging in as user “bob” with password “less-secret” – it’ll take you to the front page.
So everything is working reasonably well – time to “git add” and “git commit” in the Bash console, just so that we have something to go back to if we break stuff.
Our next step is to actually use this login stuff to protect our site. First, load up the template for the main page – not the login page template that we’ve been editing so far. Near the bottom, we have the HTML that defines the input field where people can add comments; it looks like this:
<div class="row">
    <form action="." method="POST">
        <textarea name="contents" placeholder="Enter a comment" class="form-control"></textarea>
        <input type="submit" class="btn btn-success" value="Post comment">
    </form>
</div>
What we want to do is hide that if the person viewing is not logged in. This is really easy to do; Flask-Login
makes an object called current_user available in our templates. If a user is logged in, the field
is_authenticated on that object is set to True. (Specifically, this is because the value of current_user is the User
object representing the logged-in user, and UserMixin provides a field called is_authenticated that is always True.)
So, we can do this:
{% if current_user.is_authenticated %}
    <div class="row">
        <form action="." method="POST">
            <textarea name="contents" placeholder="Enter a comment" class="form-control"></textarea>
            <input type="submit" class="btn btn-success" value="Post comment">
        </form>
    </div>
{% endif %}
The only changes there are the {% if... %} and {% endif %} lines.
Save the file, reload the site, and go to the main page, hit refresh, and you’ll see this:
Oops. No change. We’re already logged in, after our test of the login page a few minutes ago. Because we show the comment form to people who are logged in, we still see it, which is not a great test of our code to hide it! We need to somehow log out. So let’s write the view for that.
(An aside: some people might have noticed that the fact that we’re logged in has persisted even though the website has been reloaded – that’s different to what happened in the first tutorial, when we had to store comments in a database before things would persist. This is because Flask-Login is doing clever stuff with browser cookies.)
Go to the browser tab where you have flask_app.py, and add a new view:
@app.route("/logout/")
@login_required
def logout():
    logout_user()
    return redirect(url_for('index'))
…and add logout_user and login_required to the list of things that we’re importing from flask_login near the top of the
file. Note the new decorator on the view, login_required – this is provided by Flask-Login and allows you
to protect views so that they can only be accessed by logged-in users. The lines inside the code, as you can
probably guess, tell Flask-Login to note that the user has been logged out, then send them back to the front page
of the site.
It would be nice to provide an easy way to log in and log out from the front page of the site, so go back
to the main_page.html template, and change the nav section at the top so that it has a “log in” link if the user is not logged
in, or a “log out” link if they are. Here’s the complete nav section that you need, but the only new stuff
is the ul section near the end, the rest should already be there:
<nav class="navbar navbar-inverse">
  <div class="container">
    <div class="navbar-header">
      <button type="button" class="navbar-toggle collapsed" data-toggle="collapse" data-target="#navbar" aria-expanded="false" aria-controls="navbar">
        <span class="sr-only">Toggle navigation</span>
        <span class="icon-bar"></span>
        <span class="icon-bar"></span>
        <span class="icon-bar"></span>
      </button>
      <a class="navbar-brand" href="#">My scratchpad</a>
    </div>
    <ul class="nav navbar-nav navbar-right">
        {% if current_user.is_authenticated %}
            <li><a href="{{ url_for('logout') }}">Log out</a></li>
        {% else %}
            <li><a href="{{ url_for('login') }}">Log in</a></li>
        {% endif %}
    </ul>
  </div>
</nav>
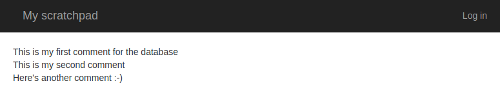
Once you’ve done that, reload the website, and then go to your tab showing the site. Hit the browser refresh button, and you should see a “Log out” link near the top right:
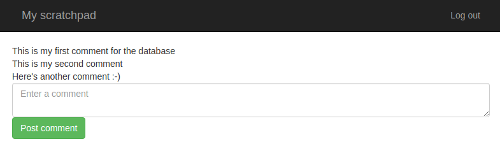
Click that, and you’ll be taken to the front page again – but the place to enter a comment will have disappeared, and the link near the top right will have changed to say “Log in”.
Click the “Log in” link, and you’ll be taken to the login page, where you can log in as admin, bob or caroline, using the passwords we defined in the code (maybe trying some invalid logins first if you really want to test it). When you do that, you’ll be taken to the main page, and you’ll be able to add comments again.
As always, if it’s not working, try to debug it – it’s the best way to learn! If you’re getting server error messages, take a look at the error log – there’s a link on the “Web” page inside PythonAnywhere:
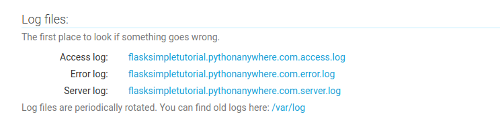
Inside the error log, the most recent error message will be at the bottom.
If you can’t get it to work, then here’s the code that you should have now for you to copy/paste (though you’ll need to update the database connection URI to match your own database settings):
The Python code:
from flask import Flask, redirect, render_template, request, url_for
from flask_sqlalchemy import SQLAlchemy
from flask_login import login_required, login_user, LoginManager, logout_user, UserMixin
from werkzeug.security import check_password_hash, generate_password_hash

app = Flask(__name__)
app.config["DEBUG"] = True

SQLALCHEMY_DATABASE_URI = "mysql+mysqlconnector://{username}:{password}@{hostname}/{databasename}".format(
    username="SOMETHING",
    password="SOMETHINGELSE",
    hostname="SOMETHING.mysql.pythonanywhere-services.com",
    databasename="SOMETHING$comments",
)
app.config["SQLALCHEMY_DATABASE_URI"] = SQLALCHEMY_DATABASE_URI
app.config["SQLALCHEMY_POOL_RECYCLE"] = 299
app.config["SQLALCHEMY_TRACK_MODIFICATIONS"] = False
db = SQLAlchemy(app)

app.secret_key = "something random"
login_manager = LoginManager()
login_manager.init_app(app)


class User(UserMixin):

    def __init__(self, username, password_hash):
        self.username = username
        self.password_hash = password_hash


    def check_password(self, password):
        return check_password_hash(self.password_hash, password)


    def get_id(self):
        return self.username

all_users = {
    "admin": User("admin", generate_password_hash("secret")),
    "bob": User("bob", generate_password_hash("less-secret")),
    "caroline": User("caroline", generate_password_hash("completely-secret")),
}


@login_manager.user_loader
def load_user(user_id):
    return all_users.get(user_id)


class Comment(db.Model):

    __tablename__ = "comments"

    id = db.Column(db.Integer, primary_key=True)
    content = db.Column(db.String(4096))


@app.route("/", methods=["GET", "POST"])
def index():
    if request.method == "GET":
        return render_template("main_page.html", comments=Comment.query.all())

    comment = Comment(content=request.form["contents"])
    db.session.add(comment)
    db.session.commit()
    return redirect(url_for('index'))


@app.route("/login/", methods=["GET", "POST"])
def login():
    if request.method == "GET":
        return render_template("login_page.html", error=False)

    username = request.form["username"]
    if username not in all_users:
        return render_template("login_page.html", error=True)
    user = all_users[username]

    if not user.check_password(request.form["password"]):
        return render_template("login_page.html", error=True)

    login_user(user)
    return redirect(url_for('index'))


@app.route("/logout/")
@login_required
def logout():
    logout_user()
    return redirect(url_for('index'))
The main page template:
<html>
    <head>
        <meta charset="utf-8">
        <meta http-equiv="X-UA-Compatible" content="IE=edge">
        <meta name="viewport" content="width=device-width, initial-scale=1">

        <link rel="stylesheet" href="https://maxcdn.bootstrapcdn.com/bootstrap/3.3.5/css/bootstrap.min.css" integrity="sha512-dTfge/zgoMYpP7QbHy4gWMEGsbsdZeCXz7irItjcC3sPUFtf0kuFbDz/ixG7ArTxmDjLXDmezHubeNikyKGVyQ==" crossorigin="anonymous">
        <title>My scratchboard page</title>
    </head>

    <body>
        <nav class="navbar navbar-inverse">
            <div class="container">
                <div class="navbar-header">
                    <button type="button" class="navbar-toggle collapsed" data-toggle="collapse" data-target="#navbar" aria-expanded="false" aria-controls="navbar">
                        <span class="sr-only">Toggle navigation</span>
                        <span class="icon-bar"></span>
                        <span class="icon-bar"></span>
                        <span class="icon-bar"></span>
                    </button>
                    <a class="navbar-brand" href="#">My scratchpad</a>
                </div>
                <ul class="nav navbar-nav navbar-right">
                    {% if current_user.is_authenticated %}
                        <li><a href="{{ url_for('logout') }}">Log out</a></li>
                    {% else %}
                        <li><a href="{{ url_for('login') }}">Log in</a></li>
                    {% endif %}
                </ul>
            </div>
        </nav>


        <div class="container">
            {% for comment in comments %}
                <div class="row">
                    {{ comment.content }}
                </div>
            {% endfor %}

            {% if current_user.is_authenticated %}
                <div class="row">
                    <form action="." method="POST">
                        <textarea name="contents" placeholder="Enter a comment" class="form-control"></textarea>
                        <input type="submit" class="btn btn-success" value="Post comment">
                    </form>
                </div>
            {% endif %}
        </div><!-- /.container -->

    </body>
</html>
The login page template:
<html>
    <head>
        <meta charset="utf-8">
        <meta http-equiv="X-UA-Compatible" content="IE=edge">
        <meta name="viewport" content="width=device-width, initial-scale=1">

        <link rel="stylesheet" href="https://maxcdn.bootstrapcdn.com/bootstrap/3.3.5/css/bootstrap.min.css" integrity="sha512-dTfge/zgoMYpP7QbHy4gWMEGsbsdZeCXz7irItjcC3sPUFtf0kuFbDz/ixG7ArTxmDjLXDmezHubeNikyKGVyQ==" crossorigin="anonymous">

        <title>My scratchboard page: log in</title>
    </head>

    <body>
        <nav class="navbar navbar-inverse">
            <div class="container">
                <div class="navbar-header">
                    <button type="button" class="navbar-toggle collapsed" data-toggle="collapse" data-target="#navbar" aria-expanded="false" aria-controls="navbar">
                        <span class="sr-only">Toggle navigation</span>
                        <span class="icon-bar"></span>
                        <span class="icon-bar"></span>
                        <span class="icon-bar"></span>
                    </button>
                    <a class="navbar-brand" href="#">My scratchpad: login page</a>
                </div>
            </div>
        </nav>

        <div class="container">

            <div class="row">
                {% if error %}
                    <div class="alert alert-warning" role="alert">
                        Incorrect username or password
                    </div>
                {% endif %}
                <form action="." method="POST">
                  <div class="form-group">
                    <label for="username">Username:</label>
                    <input class="form-control" id="username" name="username" placeholder="Enter your username">
                  </div>
                  <div class="form-group">
                    <label for="password">Password:</label>
                    <input type="password" class="form-control" id="password" name="password" placeholder="Enter your password">
                  </div>
                  <button type="submit" class="btn btn-success">Log in</button>
                </form>
            </div>

        </div>

    </body>
</html>
That’s definitely worthy of a commit! We have a secure-looking site. Head over to the bash console, git add,
git commit, you know the drill by now :-)
Real security
Now, you might have noticed that I said “a secure-looking site” just then. It does look secure, but it actually isn’t. Although we don’t display anything on the web page to allow someone who isn’t logged in to add a comment to your site, there’s nothing stopping people from sending carefully-crafted requests that look as if they’re coming from the web page down to your Flask server and adding comments. You can get a feel for the problem by:
- Going to the front page, and logging in (if you’re not already logged in)
- Right-click on the “Log out” link, and open it in a new tab. You’re now logged out – check the new tab to confirm.
- In the old tab, type a comment into the still-visible “enter a comment” field, and submit it.
You’ll see that the comment was added, even though you were logged out; the comment input field will disappear, but
it’s too late for that to be of much use. A hacker who wanted to put stuff on your
page wouldn’t need even be logged in in the first place; they could use a tool like cURL to send POST requests
directly to the Flask server – without even using a browser. (If you’re interested in how hackers do stuff like
this, Rob Graham of Errata Security wrote
a ‘Hacking for beginners’ blog post
explaining some of the details, in the context of getting early access to Twitter’s 280-character tweets.)
What we need to do is add some server-side validation – that is, when we receive a POST request that is trying
to add a comment to our database, we should check first whether or not the user is logged in. This is a simple
change to the index view in flask_app.py – just add this, just before the line that creates a new Comment
object:
if not current_user.is_authenticated:
    return redirect(url_for('index'))
…and also add current_user to the set of things we import from flask_login at the top of the file. Reload
the website, and try going through those three steps that showed the problem before – log in, log out in a separate tab,
try to submit a comment from the original tab. This time, when you try
to post a comment as a non-logged-in user, it’ll just take you back to the main page without storing the comment.
Phew!
Now we have a site that actually is secure :-) It’s always important when creating a web app to think about backend security. Front-end security just makes the site look secure – which is, of course, pretty important – but it’s the security that you build into your Flask views that matters.
Commit those changes, and – if you like – switch off the password protection at the bottom of the “Web” page inside PythonAnywhere – we have something better now, so we don’t need it. You’ll need to reload the website using the green button once you’ve switched it off.
Adding timestamps
So, we can log in and log out. Our goal for this tutorial is to be able to say who posted comments, and when. The timestamp is the easiest one of these, so let’s add that first.
As always, we’ll start off by designing how it will look – initially by passing the current time to the template
and rendering that, along with the “name” anonymous, for every comment – just so we can get a feel for what it will look
like. To do that, add this line to the top of the Python file to import the datetime class from the Python standard library:
from datetime import datetime
…then change the code that renders the template in the index view from this:
return render_template("main_page.html", comments=Comment.query.all())
…to this:
return render_template("main_page.html", comments=Comment.query.all(), timestamp=datetime.now())
Now, reload the web app and take a look at the site – it won’t have changed. This is a good thing!
Next, we’ll change the main template file. Right now, we have a for loop and inside it, for each comment, we have this HTML
to show the comment:
            <div class="row">
                {{ comment.content }}
            </div>
Replace it with this code, which adds a simple timestamp:
            <div class="row" style="margin-bottom: 1ex">
                <div>
                    {{ comment.content }}
                </div>
                <div>
                    <small>Posted {{ timestamp.strftime("%A, %d %B %Y at %H:%M") }} by anonymous</small>
                </div>
            </div>
Reload the website, and check out the site again – now you’ll see that each comment has a timestamp next to it, saying something like “Posted Friday, 13 October 2017 at 16:36 by anonymous”:
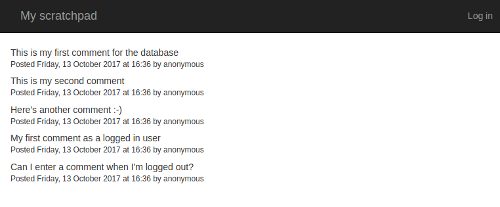
Because we’re not storing the timestamps yet, all of them will have the same timestamp – the time at which the page was loaded. But it’s a start!
If you prefer US-style date formatting, where the month comes before the day, the change is really simple –
just swap around the %d and the %B in the template where it says
{{ timestamp.strftime("%A, %d %B %Y at %H:%M") }}
What that line means is “call the strftime method on the timestamp object that we’re passing in to the
template”. You can read more about what all of the different options for the % bits in there mean on
this Python documentation page.
Once you have everything looking the way you want, let’s take a checkpoint – the normal git add then git commit,
maybe with a git status or a git diff if you feel like it.
Migrations part one – starting with a virtualenv
Now it’s time to write the code to actually save a timestamp for each comment – we’ll do commenter names later. This is a little tricky. Right now, we have a number of comments on our site. Those comments don’t have timestamps, and even worse, they’re stored in a database table that doesn’t have a column where we could store timestamps. Remember, a database is a bit like a spreadsheet. There are a number of “tables”, just like a spreadsheet has a number of sheets, and each table is made up of rows and columns. Each row represents one object – that is, each row is one comment for our existing site. It’s easy to add new comments by adding new rows. But the columns are fixed – our current comments table has just two columns, for the private database ID and the content of each comment. We want to add a new column.
Now, for a website we’re just building to play with like this one, we could just delete everything and build the database up from scratch, this time with a timestamp column. But for a real site that would be a bit destructive – and anyway, this is a tutorial, so we really should use best practices :-)
What we need to do is change the database structure – the definition of the set of columns that the comments table has
– in a controlled way, without affecting the existing data. We want to be able to add a new timestamp
field to our Comment class, which is simple enough – we just change the code – but we also want to be able to change the
database to add the new column, putting a sane value in there for the existing comments.
It is actually possible to do that by starting a MySQL console and changing things by hand, using the ALTER TABLE command, but it’s a lot
of hassle – and doesn’t work very well when you’re making regular changes as you extend your site. So
we’re going to use something called migrations. A migration is, conceptually, a change to a database’s
structure packaged up as a small Python file that knows how to make the change.
Just like there is Flask-SQLAlchemy to interface with the database, and Flask-Login to handle logins, there’s a Flask extension that knows how to do migrations for us. One problem, though – it’s not installed on PythonAnywhere by default. So we’re going to need to install a new package.
The way we’re going to do that is to use a thing called a “virtualenv”; there are a couple of ways to install packages on PythonAnywhere, but virtualenvs are the best in the long run. They’re basically private stores inside your PythonAnywhere account of the specific modules (Flask and its extensions) that your site depends on – check out the link above if you want the details of how they work.
So, we want to add a timestamp. That means we need to add a migration. That means that we need to install a new extension. And that means that we need to create a virtualenv. This kind of cascade happens frequently enough when coding that it’s got a name: yak shaving. Let’s strop our razor and get to it.
In your bash console, and run the following command:
mkvirtualenv flask-tutorial --python=python3.6
It will take a little time to run. The command mkvirtualenv comes from a helpful package called
virtualenvwrapper; virtualenvs can be a little fiddly to work with if you use the normal tools, and
virtualenvwrapper provides some helpful, well, wrappers. The parameters that we’ve given it are first,
a name for our virtualenv, flask-tutorial, and secondly, a specification of which version of Python
we want to use – any given computer can have multiple versions installed (PythonAnywhere has a bunch,
unsurprisingly), but a virtualenv normally only supports one, so you need to be clear which one you want to use.
Once the command has completed, you’ll notice that the prompt has changed a bit. Before it would have been something like this:
16:39 ~/mysite (master)$
But now it will look like this:
(flask-tutorial) 16:45 ~/mysite (master)$
When you’re working on a virtualenv, the prompt shows you its name at the start. This is very useful if you have
lots of them, of course. If you want to do something with your virtualenv later, like install more packages,
then you need to make sure it’s active – the prompt helps you see easily if it is. If it’s not, you can activate
the virtualenv by running the bash command workon flask-tutorial.
Now, our next step is to install some packages using pip. Initially, we’ll just get our virtualenv to contain
the packages we’re already using – not the migration stuff we’re about to use. Virtualenvs contain no packages
by default, not even Flask, so there are four that we need to install:
Flask itself, the Flask-Login plugin, the Flask-SQLAlchemy plugin, and mysqlconnector, a library that helps SQLAlchemy talk to MySQL.
They also have various dependencies – Flask depends on a templating library called Jinja, for example – but
you don’t need to worry about those – pip will automatically install them for you. All you need to do
is run this command:
pip install 'SQLAlchemy<1.4' flask flask-login flask-sqlalchemy mysql-connector-python==8.0.29
That will take a little while to run. It will download all of the packages, along with their dependencies, and install them into your virtualenv. Put your feet up for a bit, or make a cup of tea.
When it’s finished and you get the bash prompt back, you can see what it has installed by running the
pip freeze command. You’ll see something like this:
-f /usr/share/pip-wheels
click==6.7
Flask==0.12.2
Flask-Login==0.4.0
Flask-SQLAlchemy==2.3.2
itsdangerous==0.24
Jinja2==2.9.6
MarkupSafe==1.0
mysql-connector-python==8.0.29
SQLAlchemy==1.1.14
Werkzeug==0.12.2
You can see that it’s showing you not only the packages you installed, but also the dependencies, and it’s showing the version number for each one after a double-equals sign. (You might get different versions to the ones shown above – don’t worry about that.)
Just out of interest, let’s compare that to the set of packages that you had installed when you weren’t inside your virtualenv. Run the following command to exit the env:
deactivate
You’ll see that the bash prompt will lose the (flask-tutorial) prefix. Now, let’s see what PythonAnywhere
has installed by default for Python 3.6:
pip3.6 freeze
Note that because we’re not using our virtualenv any more, we need to be specific about the version of Python
we want to see the list of installed packages for – hence the 3.6 at the end of the pip command.
You’ll get several pages-worth. All very useful when you’re just getting started, but we’re branching off
into more advanced stuff now and taking control of our dependencies :-) Let’s go back into our nice, pared-down,
minimal virtualenv:
workon flask-tutorial
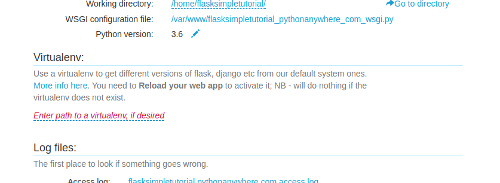
So, we have a virtualenv. But our website is still using the packages that were installed system-wide, so it’s not being used. The next step is to fix that. Open a new tab by right-clicking the PythonAnywhere logo, and go to the “Web” page. Make sure that your website is selected, then scroll down a bit. You’ll see a section with the header “Virtualenv”:
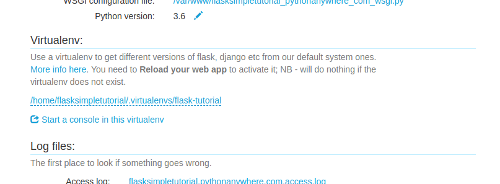
Click on the link to edit the field, and enter the name of the virtualenv you created earlier,
flask-tutorial, and click the button to apply the change. The system will think for a second, and then fill in a full path to the virtualenv.
A virtualenv is just a directory in your private file storage – but because you’re using virtualenvwrapper, it’s in a specific directory that PythonAnywhere knows about, so you can just specify the name.
Now that we’ve made a change on the “Web” tab, the next step is to reload the website to make that change take effect. Scroll back up to the top of the page, and click the green “Reload” button (which is the stand-alone equivalent of the reload button in the editor that we were using before). Wait for the spinner to disappear, and then check out the site again. If all went well, it should display just like it did before, showing all of the comments that were already there, complete with fake timestamps. Hooray!
Well, maybe not quite “hooray”, as all we’ve done is avoid breaking things – however, sometimes that’s just how coding works ;-)
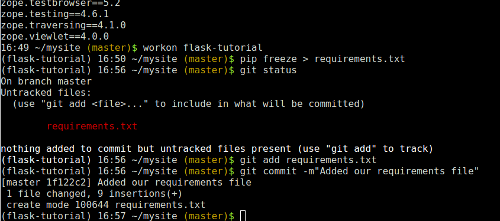
It’s good practice to keep a list of the external packages that your code depends on inside your Git repository.
The tradition is to use a file called requirements.txt. In order to avoid having to type everything in, we’ll
use a bash command, so go back to the bash console.
We want to create a file called requirements.txt that lists the packages we use. And we already know
there’s a command pip freeze that will produce that list. So we can run the command and tell it to write its
output to a file:
pip freeze > requirements.txt
If all goes well, that command will just send you back to the prompt. Now, open another tab by right-clicking
the PythonAnywhere logo, and go to the “Files” page, then down into the mysite directory. You’ll see the file
requirements.txt – click on it to load it into the editor. You should see the same list of dependencies you
did before.
What we want to do here is remove the first line, the one that says -f /usr/share/pip-wheels; it’s not actually
one of our requirements, it’s just some extra junk that pip has printed. So remove that line, then save the file.
Now let’s get the requirements file into our repository. Back in the bash console, run git status – you’ll see
that requirements.txt is in red because it’s untracked. git add it, then git commit to take a
checkpoint and add it to the repository:
Migrations
OK, so now we have a virtualenv; the yak we’re shaving is lathered up. We want to install the Flask database migration extension into it. Logically enough, it’s called Flask-Migrate. To install it, go to your bash console, and run this:
pip install Flask-Migrate
That will take a minute or two to install, as Flask-Migrate depends on a much larger module called alembic,
which actually does all the migration stuff.
Once it’s all installed, we need to configure our code to use it. We do this before we make any changes to the database, because we’re going to have to run some commands first in order to let the system know what the current state of the database is before we start adding stuff.
When you want to add a new thing to the database, you add the thing you want to the Python code, then run a command to create a new migration – a generated Python file that will make the appropriate changes to the database’s structure. The command works out what to do by comparing what it sees in the database with what the code seems to expect, then generating a migration that changes the database in the appropriate way. If that all sounds a bit hard to get your head around, don’t worry – it’ll become clearer once we’ve worked through the example.
In your code editor for flask_app.py, add a new line just underneath the bit where you import flask_sqlalchemy:
from flask_migrate import Migrate
Next, just after the bit where you have db = SQLAlchemy(app), add this line to enable Flask-Migrate for your site:
migrate = Migrate(app, db)
The “import” line makes the migration stuff available, of course. The second connects everything up so that the migration system knows that it needs to be handling migrations for your app, specifically relating to its connection to the SQLAlchemy database connection.
Save the file, then go back to your bash console.
Our next step is to create a directory where the migrations are going to live. Remember, each migration is a small Python file that defines how to make a change to the database’s structure. We need to have somewhere to store them, so run these two commands:
export FLASK_APP=flask_app.py
flask db init
It will print out a few lines saying that it’s creating directories and files, with a warning at the end:

We can ignore the warning for now. Let’s take a closer look at those two commands. We’ll start with the second one:
flask db init
Because we have Flask installed, we have access to a bash command called flask. It’s a general utility script
for doing stuff with Flask code, and some extensions – like Flask-Migrate – hook into it to provide an easy way
to run their own commands. The db init parameters tell it to execute some stuff provided by Flask-Migrate,
which does the file and directory setup for migrations that we wanted.
The first line:
export FLASK_APP=flask_app.py
…sets an environment variable – basically a variable inside Bash. It’s necessary because the flask
command doesn’t necessarily know where the code for the Flask app you’re asking it to work on might reside.
One thing that’s worth knowing – environment variables don’t persist between Bash sessions, so if you start
a new Bash console – or if the one you’re working in is reset due to system maintenance on the PythonAnywhere
side, or something like that – then you’ll need to run the export command again to re-set it. That said,
Flask won’t do anything harmful if you don’t have the environment variable set, it will just print out a
reasonably helpful error, like this:
Error: Could not locate Flask application. You did not provide the FLASK_APP environment variable.
…so you’ll know what you need to do.
OK, so we have our directory set up for migrations.
The next step is to create an “initial migration”. Because each migration – each change that is made to the
database – is represented by some Python code, we need to have an initial one that represents how to get from
an empty database to the state it was in before we started using Flask-Migrate – that is, the state that it is
currently in with the existing comments table with its two columns. This is actually a little
fiddly with Flask-Migrate when you have a database with some structure already, because it generates
each migration by looking at what’s in the database, then looking at the code, and comparing the two. Right
now the code and the database match up OK, so it won’t know what to do.
(Of course, we wouldn’t have this problem if we’d used Flask-Migrate from the start – but if you’re feeling a little overwhelmed now, just imagine what it would have been like it all of this has been in the first part of the tutorial! Don’t worry, it gets easier.)
However, there is a way – what we want to do is tell it to compare the current code with an empty database, and generate a migration that would create the appropriate structure in that database.
To do this, go to the PythonAnywhere “Databases” page in a new browser tab, and create a new database called
dummyempty. (In the unlikely event that you already have one with that name, just pick something else.)
Next, temporarily, we’ll tell our Flask code to use the dummyempty database. Go to the tab where your Python code lives, and change the line
databasename="yourdbusername$comments",
…to say
databasename="yourdbusername$dummyempty",
Don’t forget to replace yourdbusername with your actual MySQL username from the “Databases” tab. Save the
file, but don’t reload the website. This means that your site will keep running with the old code
while we sort out this database stuff.
Now we can generate the migration. Go to your bash console, and run
flask db migrate
You’ll see something like this:

The next step is to go back and change your code again so that it’s not pointing at the wrong database – change it back to saying
databasename="yourdbusername$comments",
…then save the file.
So now we have a migration file that contains Python code that knows how
to create our database structure from scratch. It’s worth noting that the file only contains information about
the database structure – that is, there’s a table called comments that has certain specific columns. It doesn’t
contain the comments themselves. Take a look at the file – it was the last thing printed out by the flask db migrate command, and you can
load it up into the editor via the “Files” page. It will look something like this:
"""empty message

Revision ID: 2eb39767bbe9
Revises:
Create Date: 2017-10-13 17:13:04.513323

"""
from alembic import op
import sqlalchemy as sa


# revision identifiers, used by Alembic.
revision = '2eb39767bbe9'
down_revision = None
branch_labels = None
depends_on = None


def upgrade():
    # ### commands auto generated by Alembic - please adjust! ###
    op.create_table('comments',
    sa.Column('id', sa.Integer(), nullable=False),
    sa.Column('content', sa.String(length=4096), nullable=True),
    sa.PrimaryKeyConstraint('id')
    )
    # ### end Alembic commands ###


def downgrade():
    # ### commands auto generated by Alembic - please adjust! ###
    op.drop_table('comments')
    # ### end Alembic commands ###
The upgrade function fairly clearly is instructions to create a table called comments with the two columns
that we already have. The downgrade function is the opposite – it deletes the table called comments.
There is one final step before we’re done with this “initial” migration. Flask-Migrate keeps track of which migrations have been applied to your database – it does this (in a kind of recursive, Inception-like manner) by keeping data in a database table in your database to say what migration the database last had applied to it. Got that? ;-)
What we need to do is tell Flask-migrate “the stuff you see in the database right now is exactly what correponds to the most recent migration you’ve generated – don’t worry about trying to add anything for it”. The command for this is pretty simple, if somewhat violent-sounding:
flask db stamp head
…which you need to run now in your bash console.
Now, hopefully everything is in sync. We can check that in two ways:
Firstly, we know that right now, we have one migration, which knows how to create the database structure that
is needed by the code that we currently have. And we know that the structure of our existing database should match that exactly.
So if we ask Flask-Migrate to create a new migration, it should work out that nothing has changed in the code
to require a migration, so it should come back to us saying “I don’t need to do anything”. Let’s try,
by running flask db migrate again:

“No changes in schema detected”. So that’s good news. Now let’s check things out from a different angle. Head over to the “Databases” tab,
and click the yourusername$comments link to start a MySQL database console. When it’s showing its
mysql> prompt, type
show tables;
You’ll see that as well as the comments table that holds our comments, we have a new one called
alembic_version. Remember that Alembic is the underlying libary that Flask-Migrate uses to do its work.
Let’s take a look at what it contains; run
select * from alembic_version;
You’ll see something like this:
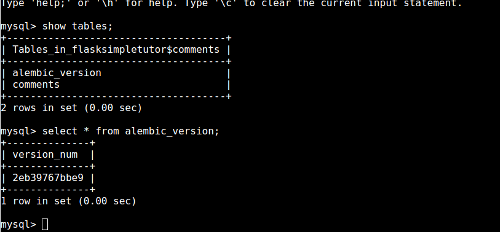
So there’s single a version_num column, and one row with a hexadecimal number in the column. What does that
mean? Click back to your browser tab where you have the bash console, and look back a few commands to where you
ran the first flask db migrate command – the one that generated the initial migration, not the one that did nothing.
You’ll see that the file that it generated had a name with _.py at the end. Before the _.py, there will be the same
hexadecimal number. Likewise, when we ran flask db stamp head, it printed out a message to the effect that
it was running stamp_revision to that same number.
Basically, Flask-Migrate is tracking different migrations by giving them random hexadecimal numbers as names, and then is storing them in files that contain that number, and storing the number in the database to keep track of which ones it has applied.
Understanding database migrations is hard, and there aren’t many good explanations of it out there. Hopefully that all made things reasonably clear, but if you have any questions, please leave a comment below and we’ll try to clear things up – and to improve this explanation if it turns out we’ve missed out something important!
OK, so now we have migrations working. Once again, we’ve changed nothing visible – but we’re in the right place
to make the next step forward. As always, let’s save a checkpoint. There are a couple of things we need to
do to make sure it’s fully consistent. Firstly, we need to update our requirements.txt so that we record
the fact that we now depend on Flask-Migrate. Once again, run
pip freeze > requirements.txt
…in your bash console, then edit the requirements file to remove the junk line from the start, and save it.
Next, commit the changes into git. We need to add all of the new migration files as well as our changes to
the Flask app, so don’t forget to git add:
Finally adding the timestamp field
Now let’s add our new field so that each comment stores when it was originally posted.
At last! All we need to do for this is add a new line to the Comment class’s
definition in flask_app.py. Right now we have this:
class Comment(db.Model):

    __tablename__ = "comments"

    id = db.Column(db.Integer, primary_key=True)
    content = db.Column(db.String(4096))
…so just add a new line after the definition of the content field like this, to say that we need a new
column called “posted”, which is a date/time object, with a default of “now” – that is, the time the comment
was created.
posted = db.Column(db.DateTime, default=datetime.now)
Hopefully that’s pretty self-explanatory :-) Save the file, and now let’s make the change to the database structure needed to support our new field in its own column. Back in our bash console, once again run the command to generate a migration:
flask db migrate
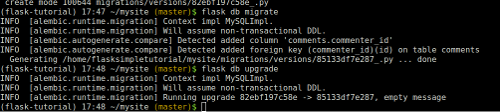
Now, just like last time, that has generated a file that contains the code required to make a change to the
database – specifically, to add a new column called posted. But our database doesn’t have that column
yet. To actually make the change to the database, we run this:
flask db upgrade
You’ll see output like this:
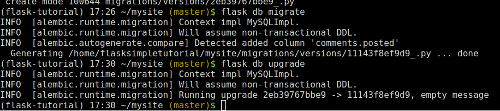
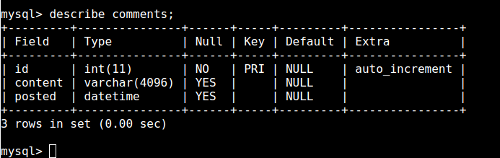
It’s updated our database by adding the new column! To confirm that, go to the MySQL console that you created
earlier, and run the command describe comments; to see what the comments table looks like now
that we’ve run that migration:
Now let’s change our code to use the new column that we’ve added. Go to the tab where you
have the Flask code, and change the line in the index view that renders the template back to the code we had earlier,
which just passes the list of comments through and doesn’t pass in a datetime:
return render_template("main_page.html", comments=Comment.query.all())
Next, in the main template, change the code that displays the timestamp so that it extracts it from the comment object, by replacing this:
<small>Posted {{ timestamp.strftime("%A, %d %B %Y at %H:%M") }} by anonymous</small>
…with this:
    <small>
        Posted
        {% if comment.posted %}
            {{ comment.posted.strftime("%A, %d %B %Y at %H:%M") }}
        {% else %}
            at an unknown time
        {% endif %}
        by anonymous
    </small>
What this does is display the timestamp for the comment if the comment has one, but displays “at an unknown time” for comments – like the ones that are already in the database – that don’t have a timestamp.
Finally, reload your web app from the “Web” tab or from one of your editor tabs, and the reload the site. All of your existing comments will say that they were posted at an unknown time, but if you add one (you’ll probably need to log in first), it will have the timestamp (in the “Universal” UTC timezone) set correctly:
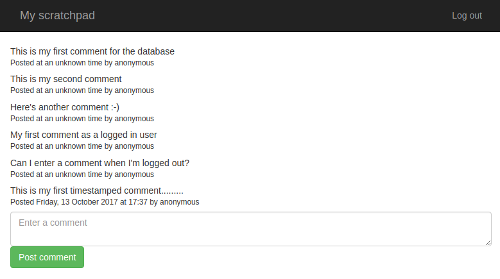
We’ve successfully added a new field to our comments, with a sensible value for the pre-existing data. Yes, that yak is now fully shaved.
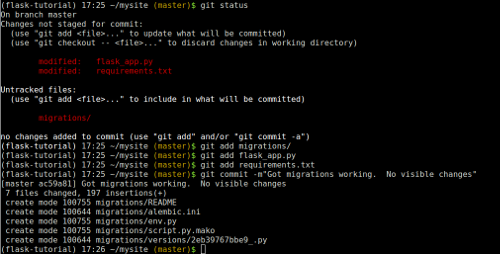
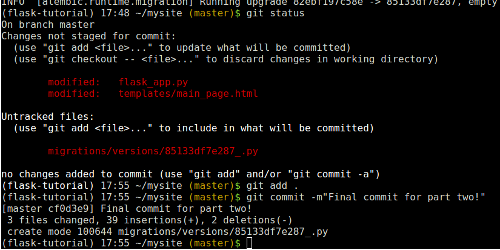
It’s git commit time. Over in the bash console. run
git status
…to see the changes, then
git add .
…to add everything. The . means “the current directory”, so it’s a quick way to stage all of
your changes for committing – run
git status
…again to confirm that the three files – the Python code, the template and the migration – have all been staged, then
git commit -m"Added a timestamp"
…to commit.
Adding the commenter field: moving the users to the database
This is the last step; we want to store who it was that made each comment. Now, we could cheat – it would be really easy to add a string column to the database, and copy the username of the currently logged in user over into it when a comment was posted. But where’s the fun in that? Much too easy. And also bad database design; right now we have this rather hacky setup where users are defined in the code. Like I said earlier, users should be kept in the database – and if there are user objects in the database, then it makes sense if each comment has a reference to the user object that created it, surely :-)
So let’s get our users into the DB. The first step is to change our user class from being a normal
Python class (which happens to inherit from the Flask-Login UserMixin class), to being one that
Flask-SQLAlchemy can deal with. Head over to your editor for flask_app.py, and change the class definition from
class User(UserMixin):
to
class User(UserMixin, db.Model):
This means that a User inherits not only the Flask-Login stuff that allows you to use it with that
package, but also the SQLAlchemy database stuff. Now, because it’s meant to be stored in the database,
we can’t just specify the two fields it contains (username and password_hash) in the __init__ function; we need to add proper database
stuff for them (and a primary key for the database’s internal use), and specify what the table is called.
Underneath the class line, add this:
    __tablename__ = "users"

    id = db.Column(db.Integer, primary_key=True)
    username = db.Column(db.String(128))
    password_hash = db.Column(db.String(128))
We can also get rid of the __init__ function – just delete this bit:
    def __init__(self, username, password_hash):
        self.username = username
        self.password_hash = password_hash
…but leave the definitions of the check_password and get_id methods as they are.
We should also get rid of our naughty, insecure dictionary of users with plaintext passwords – delete this bit:
all_users = {
    "admin": User("admin", generate_password_hash("secret")),
    "bob": User("bob", generate_password_hash("less-secret")),
    "caroline": User("caroline", generate_password_hash("completely-secret")),
}
…which means that you no longer need to import generate_password_hash at the top of the file.
The load_user function needs to be changed to check the database instead of the dictionary:
@login_manager.user_loader
def load_user(user_id):
    return User.query.filter_by(username=user_id).first()
What we’re doing here is using SQLAlchemy to query the users table in the database, and get the first item that has the given
username. It will return None if there is no user with the given username.
Finally, we need to change the code in login to check the list of users from the database. Where we currently
have this code that uses the now-non-existent dictionary:
    username = request.form["username"]
    if username not in all_users:
        return render_template("login_page.html", error=True)
    user = all_users[username]
…we should do this:
    user = load_user(request.form["username"])
    if user is None:
        return render_template("login_page.html", error=True)
…using our load_user function from earlier to get the User object, and relying on it returning
None for nonexistent users. Read through the code for login again, and make sure that you understand
what each line is doing.
So now we’ve done the code changes; we need to add the table to contain users to the database. This
is a simple database migration, just like when we added the posted timestamp column, but this one
will create a whole new table for the users. Head over to the Bash console, then run
flask db migrate
…and then
flask db upgrade
Over in the MySQL console, run show tables; to see that there really is a new table called users, and
describe users; to look at what columns it has. You can also run select * from users; to see what’s in
it – of course, it’s empty right now.
Now let’s add our users back in. Instead of putting them in code (where their passwords are available in plaintext for all to see), we’ll add them to the database from the command line. To start a Python shell with all of the Flask stuff loaded, run this in your bash console:
flask shell
In the Python interpreter that appears, firstly import our User class and the database connection:
from flask_app import db, User
Next, import the password-hashing function that we were previously using in the code:
from werkzeug.security import generate_password_hash
Finally, add the users you want, using commands like the ones below but with different passwords:
admin = User(username="admin", password_hash=generate_password_hash("new-secret"))
db.session.add(admin)
bob = User(username="bob", password_hash=generate_password_hash("super-secret"))
db.session.add(bob)
caroline = User(username="caroline", password_hash=generate_password_hash("8fwe5jYCE98lXl0ZovYW"))
db.session.add(caroline)
db.session.commit()
Hit control-D to exit the shell, then go to the MySQL console again. Run select * from users; once more to see
that you now have three rows, each representing one of the users we just added.
Now, go over to the “Web” tab to reload the website. It should work exactly as before, but when you log in, you’ll need to use the new passwords. Our users are now stored in the database!
Let’s checkpoint – git status to see what there is to add – it should be a new migration file and
some changes to flask_app.py – git add to add them, and git commit to finish off.
Adding the commenter field: storing the association
The final step is to set up an association between comments and users. This needs two fields to
be added to the Comment class in flask_app.py:
    commenter_id = db.Column(db.Integer, db.ForeignKey('users.id'), nullable=True)
    commenter = db.relationship('User', foreign_keys=commenter_id)
The first of these says that Comment objects have a field called commenter_id, which is the
database ID of the commenter, the commenter being a user defined in the users table.
(Technically, this kind of relationship between two tables in a database is
called a “foreign key”, as you can see in the code.) The second sets up a special field on Comment so that if we just
ask for comment.commenter, it will look up the user by the ID in commenter_id, and give us the object
corresponding to that user.
Save the file, then head over to the bash console, generate the migration, and upgrade the database:
Now we want to save the commenter when the comment is first created; in the Python code, where we currently have
comment = Comment(content=request.form["contents"])
…in the index view, we should put this:
comment = Comment(content=request.form["contents"], commenter=current_user)
…which simply stores the current logged-in user as the commenter when each new comment is created.
Now, over in the main_page.html template, let’s use the commenter’s name when displaying the comments – or, if
there is none, we’ll continue saying “anonymous”. Replace the
by anonymous
bit in the comment rows with this:
    by
    {% if comment.commenter %}
        {{ comment.commenter.username }}
    {% else %}
        anonymous
    {% endif %}
Reload the site once again from the “Web” tab, and visit it. You’ll see that all of the existing comments are still showing up as having been posted by “anonymous”. Add a new one – and you’ll see that the username that you’re currently logged in as is stored :-)
All fairly easy, right? Well, hopefully not horrendously difficult. Setting up the virtualenv and Flask-Migrate did take a bit of time and effort (you can probably see why we didn’t include them in the first tutorial – it’s too much to dump on someone when they’re a complete beginner), but it does pay off quickly.
As before, if you hit any problems, then try to debug it. The error log is your friend! But if you find yourself completely stuck, here’s what you should have at this point:
The Python code:
from datetime import datetime
from flask import Flask, redirect, render_template, request, url_for
from flask_login import current_user, login_required, login_user, LoginManager, logout_user, UserMixin
from flask_migrate import Migrate
from flask_sqlalchemy import SQLAlchemy
from werkzeug.security import check_password_hash


app = Flask(__name__)
app.config["DEBUG"] = True

SQLALCHEMY_DATABASE_URI = "mysql+mysqlconnector://{username}:{password}@{hostname}/{databasename}".format(
    username="SOMETHING",
    password="SOMETHINGELSE",
    hostname="SOMETHING.mysql.pythonanywhere-services.com",
    databasename="SOMETHING$comments",
)
app.config["SQLALCHEMY_DATABASE_URI"] = SQLALCHEMY_DATABASE_URI
app.config["SQLALCHEMY_POOL_RECYCLE"] = 299
app.config["SQLALCHEMY_TRACK_MODIFICATIONS"] = False
db = SQLAlchemy(app)
migrate = Migrate(app, db)

app.secret_key = "SOMETHING RANDOM"
login_manager = LoginManager()
login_manager.init_app(app)


class User(UserMixin, db.Model):

    __tablename__ = "users"

    id = db.Column(db.Integer, primary_key=True)
    username = db.Column(db.String(128))
    password_hash = db.Column(db.String(128))

    def check_password(self, password):
        return check_password_hash(self.password_hash, password)


    def get_id(self):
        return self.username


@login_manager.user_loader
def load_user(user_id):
    return User.query.filter_by(username=user_id).first()


class Comment(db.Model):

    __tablename__ = "comments"

    id = db.Column(db.Integer, primary_key=True)
    content = db.Column(db.String(4096))
    posted = db.Column(db.DateTime, default=datetime.now)
    commenter_id = db.Column(db.Integer, db.ForeignKey('users.id'), nullable=True)
    commenter = db.relationship('User', foreign_keys=commenter_id)


@app.route("/", methods=["GET", "POST"])
def index():
    if request.method == "GET":
        return render_template("main_page.html", comments=Comment.query.all())

    if not current_user.is_authenticated:
        return redirect(url_for('index'))

    comment = Comment(content=request.form["contents"], commenter=current_user)
    db.session.add(comment)
    db.session.commit()
    return redirect(url_for('index'))


@app.route("/login/", methods=["GET", "POST"])
def login():
    if request.method == "GET":
        return render_template("login_page.html", error=False)

    user = load_user(request.form["username"])
    if user is None:
        return render_template("login_page.html", error=True)

    if not user.check_password(request.form["password"]):
        return render_template("login_page.html", error=True)

    login_user(user)
    return redirect(url_for('index'))


@app.route("/logout/")
@login_required
def logout():
    logout_user()
    return redirect(url_for('index'))
The login page template:
<html>
    <head>
        <meta charset="utf-8">
        <meta http-equiv="X-UA-Compatible" content="IE=edge">
        <meta name="viewport" content="width=device-width, initial-scale=1">

        <link rel="stylesheet" href="https://maxcdn.bootstrapcdn.com/bootstrap/3.3.5/css/bootstrap.min.css" integrity="sha512-dTfge/zgoMYpP7QbHy4gWMEGsbsdZeCXz7irItjcC3sPUFtf0kuFbDz/ixG7ArTxmDjLXDmezHubeNikyKGVyQ==" crossorigin="anonymous">

        <title>My scratchboard page: log in</title>
    </head>

    <body>
        <nav class="navbar navbar-inverse">
          <div class="container">
            <div class="navbar-header">
              <button type="button" class="navbar-toggle collapsed" data-toggle="collapse" data-target="#navbar" aria-expanded="false" aria-controls="navbar">
                <span class="sr-only">Toggle navigation</span>
                <span class="icon-bar"></span>
                <span class="icon-bar"></span>
                <span class="icon-bar"></span>
              </button>
              <a class="navbar-brand" href="#">My scratchpad: login page</a>
            </div>
          </div>
        </nav>

        <div class="container">

            <div class="row">
                {% if error %}
                    <div class="alert alert-warning" role="alert">
                        Incorrect username or password
                    </div>
                {% endif %}
                <form action="." method="POST">
                  <div class="form-group">
                    <label for="username">Username:</label>
                    <input class="form-control" id="username" name="username" placeholder="Enter your username">
                  </div>
                  <div class="form-group">
                    <label for="password">Password:</label>
                    <input type="password" class="form-control" id="password" name="password" placeholder="Enter your password">
                  </div>
                  <button type="submit" class="btn btn-success">Log in</button>
                </form>
            </div>

        </div>

    </body>
</html>
The main page template:
<html>
    <head>
        <meta charset="utf-8">
        <meta http-equiv="X-UA-Compatible" content="IE=edge">
        <meta name="viewport" content="width=device-width, initial-scale=1">

        <link rel="stylesheet" href="https://maxcdn.bootstrapcdn.com/bootstrap/3.3.5/css/bootstrap.min.css" integrity="sha512-dTfge/zgoMYpP7QbHy4gWMEGsbsdZeCXz7irItjcC3sPUFtf0kuFbDz/ixG7ArTxmDjLXDmezHubeNikyKGVyQ==" crossorigin="anonymous">
        <title>My scratchboard page</title>
    </head>

    <body>
        <nav class="navbar navbar-inverse">
            <div class="container">
                <div class="navbar-header">
                    <button type="button" class="navbar-toggle collapsed" data-toggle="collapse" data-target="#navbar" aria-expanded="false" aria-controls="navbar">
                        <span class="sr-only">Toggle navigation</span>
                        <span class="icon-bar"></span>
                        <span class="icon-bar"></span>
                        <span class="icon-bar"></span>
                    </button>
                    <a class="navbar-brand" href="#">My scratchpad</a>
                </div>
                <ul class="nav navbar-nav navbar-right">
                    {% if current_user.is_authenticated %}
                        <li><a href="{{ url_for('logout') }}">Log out</a></li>
                    {% else %}
                        <li><a href="{{ url_for('login') }}">Log in</a></li>
                    {% endif %}
                </ul>
            </div>
        </nav>


        <div class="container">
            {% for comment in comments %}
                <div class="row" style="margin-bottom: 1ex">
                    <div>
                        {{ comment.content }}
                    </div>
                    <div>
                        <small>
                            Posted
                            {% if comment.posted %}
                                {{ comment.posted.strftime("%A, %d %B %Y at %H:%M") }}
                            {% else %}
                                at an unknown time
                            {% endif %}
                            by
                            {% if comment.commenter %}
                                {{ comment.commenter.username }}
                            {% else %}
                                anonymous
                            {% endif %}
                        </small>
                    </div>
                </div>
            {% endfor %}

            {% if current_user.is_authenticated %}
                <div class="row">
                    <form action="." method="POST">
                        <textarea name="contents" placeholder="Enter a comment" class="form-control"></textarea>
                        <input type="submit" class="btn btn-success" value="Post comment">
                    </form>
                </div>
            {% endif %}
        </div><!-- /.container -->

    </body>
</html>
So, there’s just one more thing to do:
That’s all, folks!
That’s it for this tutorial. We’ve taken our original Flask app, a basic list of comments entered by site visitors, which had no real security beyond a single username/password combination to log in, and we’ve turned it into something with a list of users stored in a database, and a proper login/logout system. With each comment, we store the time it was posted, and who posted it. Along the way, we’ve explored Flask-Login, Flask-Migrate, database migrations generally, and virtualenvs. And, of course, we’ve kept up our good practices with using git to store all changes so that we know what the history of our code is, and we can go back to a last working state if we break stuff.
You’re now ready to start coding proper Flask apps – congratulations :-)
If you’d like to study further, and find out more about Flask, I recommend these tutorials:
We hope you’ve found this tutorial useful, and if there’s anything that confused you, or you encountered any errors, please do leave a comment below and we’ll help you out. And likewise, if you think we should do a follow-up to this tutorial, just post a comment with your suggestion below.
Thank you very much for reading!
Acknowledgements
Many many thanks to Miguel Grinberg for creating Flask-Migrate, and in particular for helping out so quickly when we were trying to discover how to get it to work with an existing database.
Also thanks to Max Countryman for creating Flask-Login, and in particular to Armin Ronacher for Flask-SQLAlchemy and for Flask itself!