This requires a paid PythonAnywhere account
Lots of people want to use MongoDB with PythonAnywhere; we don’t have support for it built in to the system, but it’s actually pretty easy to use with a database provided by MongoDB Atlas – and as Atlas is a cloud service provided by Mongo’s creators, it’s probably a good option anyway :-)
If you’re experienced with MongoDB and Atlas, then our help page has all of the details you need for connecting to them from our systems.
But if you’d just like to dip your toe in the water and find out what all of this MongoDB stuff is about, this blog post explains step-by-step how to get started so that you can try it out.
Prerequisites
The first important thing to mention is that you’ll need a paid PythonAnywhere account to access Atlas. Free accounts can only access the external Internet using HTTP or HTTPS, and unfortunately MongoDB uses it’s own protocol which is quite different to those.
Apart from that, in order to follow along you’ll need at least a basic understanding of PythonAnywhere, writing website code and of databases in general – if you’ve been through our Beginners’ Flask and MySQL tutorial you should be absolutely fine.
Signing up to MongoDB atlas
Unsurprisingly, the first step in using Atlas is to sign up for an account (if you don’t already have one). Go to their site and click the “Try Free” button at the top right. That will take you to a page with the signup form; fill in the appropriate details, and sign up.
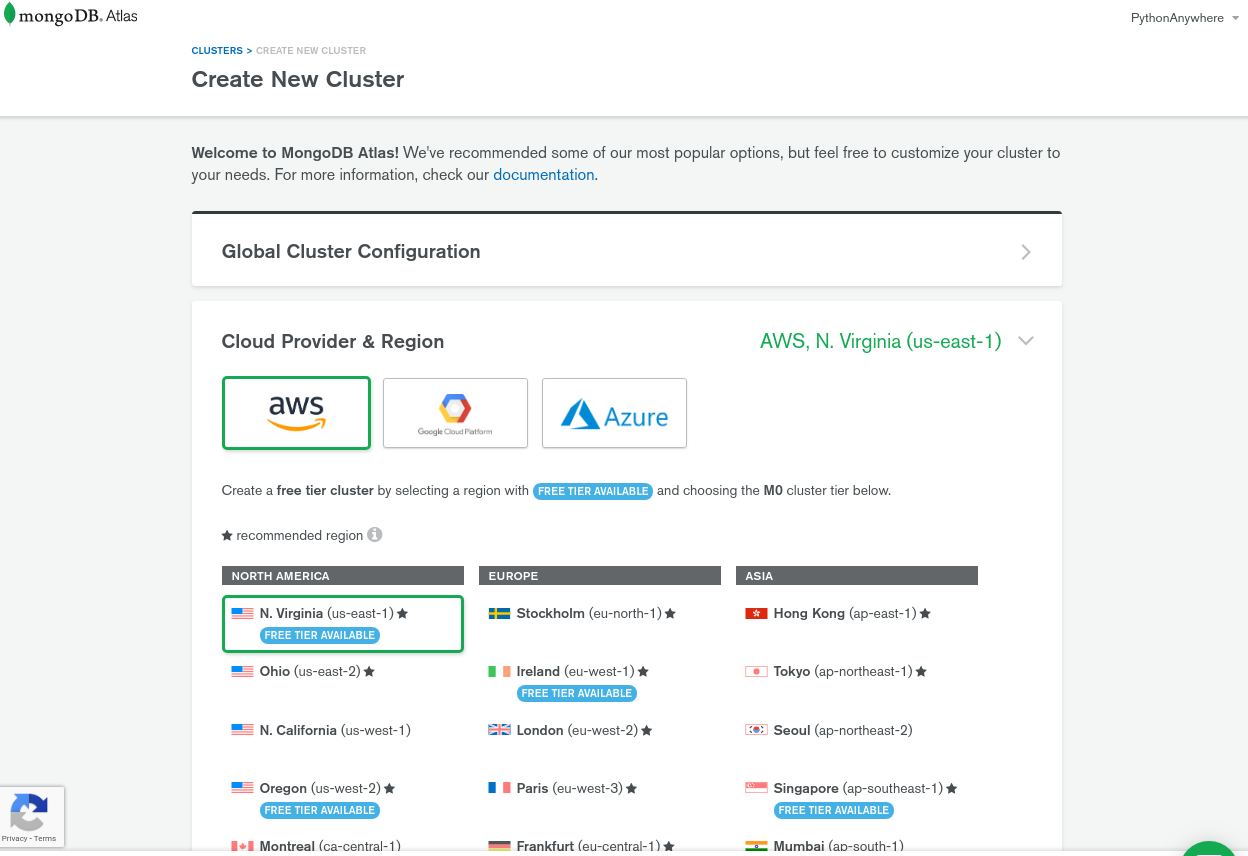
Atlas’ user interface may change a little after we publish this post (their sign-up welcome page has already changed between out first draft yesterday and the publication today!), so we won’t give super-detailed screenshots showing what to click, but as of this writing, they present you with a “Welcome” window that has some “help getting started” buttons. You can choose those if you prefer, but we’ll assume that you’ve clicked the “I don’t need help getting started” button. That should land you on a page that looks like this, which is where you create a new MongoDB cluster.
Creating your first cluster and adding a user
A MongoDB cluster is essentially the same as a database server for something more traditional like MySQL or PostgreSQL. It’s called a cluster because it can potentially spread over multiple computers, so it can in theory scale up much more easily than an SQL database.
To create the cluster:
- Choose the “AWS” cloud provider, then select the region that is closest to where your PythonAnywhere account is hosted:
- If your account is on our global site at
www.pythonanywhere.com, choose theus-east-1region. - If your account is on our EU site at
eu.pythonanywhere.com, choose theeu-central-1region.
- If your account is on our global site at
- Click the “Create cluster” button at the bottom of the page.
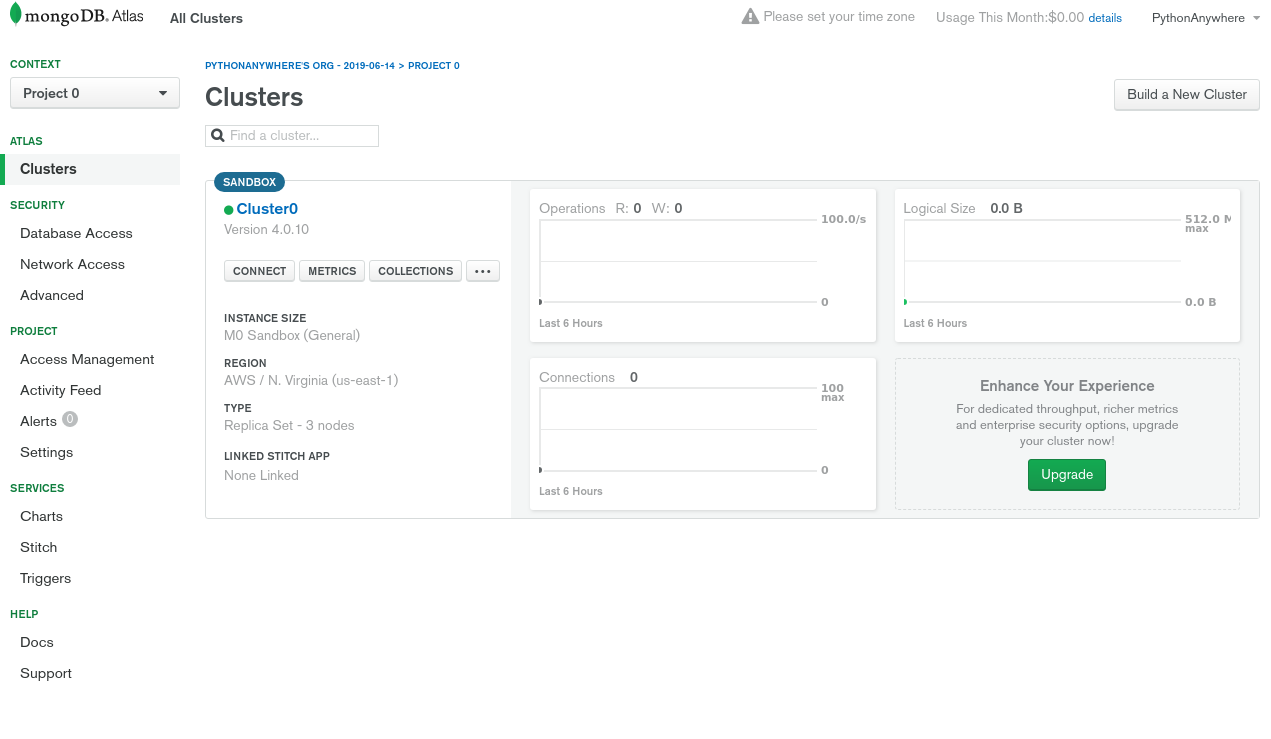
This will take you to a page describing your cluster. Initially it will have text saying something like “Your cluster is being created” – wait until that has disappeared, and you’ll have a page that will look something like this:
Now we need to add a user account that we’ll use to connect to the cluster from Python:
- Click the “Database Access” link in the “Security” section of the menu on the left-hand side, which will take you to a page where you can administer users.
- Click the “Add new user” button on the top right of the pane that appears.
- Enter a username and a password for the new user (make sure you keep a note of these somewhere)
- The “User Privileges” should be “Read and write to any database”
- The “Save as a temporary user” checkbox should not be checked.
Click the button to create the user, and you’ll come back to the user admin page, with your user listed in the list.
Setting up the whitelist
Access to your MongoDB cluster is limited to computers on a whitelist; this provides an extra level of security beyond the username/password combination we just specified.
Just to get started, we’ll create a whitelist that comprises every IP address on the Internet – that is, we won’t have any restrictions at all. While this is not ideal in the long run, it makes taking the first steps much easier. You can tighten things up later – more information about that at the end of this post.
Here’s how to configure the whitelist to allow global access:
- Click on the “Network Access” link in the “Security” section of the menu on the left-hand side, which will take you to the page where you manage stuff like whitelists.
- Click the “Add IP Address” button near the top right of the page.
- On the window that pops up, click the “Allow access from anywhere” button. This will put “0.0.0.0/0” in the “Whitelist entry” field – this is the CIDR notation for “all addresses on the Internet”.
- Put something like “Everywhere” in the “Comment” field just as a reminder as to what the whitelist entry means, and leave the “Save as temporary whitelist” checkbox unchecked.
- Click the “Confirm” button.
Getting the connection string
Now we have a MongoDB cluster running, and it’s time to connect to it from PythonAnywhere. The first step is to get the connection string:
- Click on the “Clusters” link in the “Atlas” section of the menu on the left-hand side, which will take you back to the page you got when you first created the cluster:
- Click the “Connect” button just underneath the name of the cluster (probably “Cluster0”).
- You’ll get a window with different connection options; click the “Connect your application” option.
- In “Choose your driver version”, select a “Driver” of “Python” and a version of “3.6 or later”.
- Once you’ve done that, in the “Connection String Only” section, you’ll see something like
mongodb+srv://admin:<password>@cluster0-zakwe.mongodb.net/test?retryWrites=true&w=majority
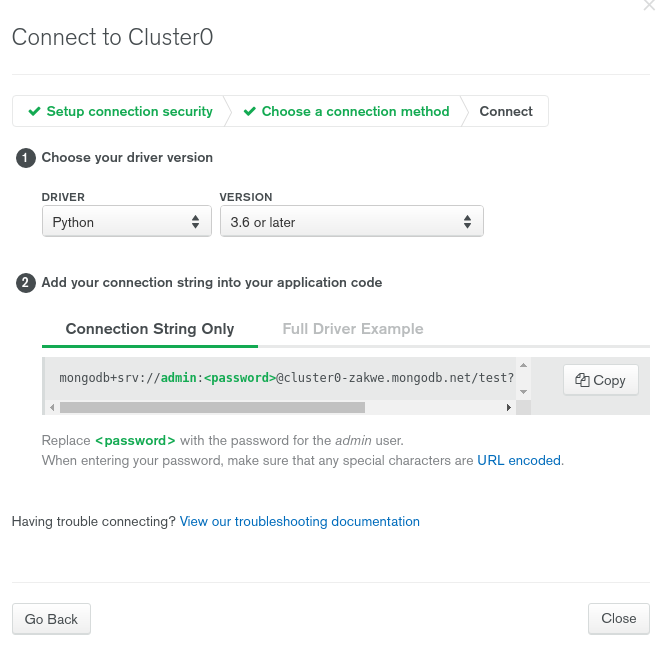
- Copy that string (there’s a button to do that for you) and paste it somewhere safe for later use. You’ll note that it has
<password>in it; you should replace that (including the angle brackets) with the actual password that you configured for your user earlier on. - Now you can close the popup with the button in the bottom right.
Connecting to the cluster from a PythonAnywhere console
Next, go to PythonAnywhere, and log in if
necessary. The first thing we need to do here is make sure that we have the correct packages
installed to connect to MongoDB – we’ll be using Python 3.7 in this example, so we need to use
the pip3.7 command. Start a Bash console, and run:
pip3.7 install --user --upgrade pymongo pymongo[srv] dnspython
Once that’s completed, let’s connect to the cluster from a command line. Run ipython3.7 in your console,
and when you have a prompt, import pymongo and connect to the cluster:
import pymongo
client = pymongo.MongoClient("<the atlas connection string>")
…replacing <the atlas connection string> with the actual connection string we got from
the Atlas site earlier, with <password> replaced with the password you used when setting up the user.
That’s created a connection object, but hasn’t actually connected to the cluster yet – pymongo only does that on an as-needed basis.
A good way to connect and at least make sure that what we’ve done so far has worked is to ask the cluster for a list of the databases that it currently has:
client.list_database_names()
If all is well, you’ll get a result like this:
['admin', 'local']
…just a couple of default databases created by MongoDB itself for its own internal use.
Now let’s add some data. MongoDB is much more free-form than a relational database like MySQL or PostgreSQL. There’s no such thing as a table, or a row – instead, a database is just a bunch of things called “collections”, each of which is comprised of a set of “documents” – and the documents are just objects, linking keys to values.
That’s all a bit abstract; I find a useful way to imagine it is that a MongoDB database is like a directory on a disk; it contains a number of subdirectories (collections), and each of those contains a number of files (each one being a document). The files just store JSON data – basically, Python dictionary objects.
Alternatively, you can see it by comparison with an SQL database:
- A MongoDB database is the same kind of thing as an SQL database
- A MongoDB collection is a bit like a table – it’s meant to hold a set of similar kinds of things – but it’s not so restrictive, and defines no columns.
- A MongoDB document is kind of like a row in such a table, but it’s not constrained to any specific set of columns – each document could in theory be very different to all of the others. It’s just best practice for all of the documents in a collection to be broadly similar.
For this tutorial, we’re going to create one super-simple database, called “blog”. Unsurprisingly for a blog, it will contain a number of “post” documents, each of which will contain a title, body, a slug (for the per-article URL) and potentially more information.
The first question is, how do we create a database? Neatly, we don’t need to explicitly do anything – if we refer to a database that doesn’t exist, MongoDB will create it for us – and likewise, if we refer to a collection inside the database that doesn’t exist, it will create that for us too. So in order to add the first row to the “posts” collection in the “blog” database we just do this:
db = client.blog
db.posts.insert_one({"title": "My first post", "body": "This is the body of my first blog post", "slug": "first-post"})
No need for CREATE DATABASE or CREATE TABLE statements – it’s all implicit! IPython will print out the string representation of the MongoDB result object that was returned by the insert_one method; something like this:
<pymongo.results.InsertOneResult at 0x7f9ae871ea88>
Let’s add a few more posts:
db.posts.insert_one({"title": "Another post", "body": "Let's try another post", "slug": "another-post", "extra-data": "something"})
db.posts.insert_one({"title": "Blog Post III", "body": "The blog post is back in another summer blockbuster", "slug": "yet-another-post", "author": "John Smith"})
Now we can inspect the posts that we have:
for post in client.blog.posts.find():
    print(post)
You’ll get something like this:
{'_id': ObjectId('5d0395dcbf76b2ab4ed67948'), 'title': 'My first post', 'body': 'This is the body of my first blog post', 'slug': 'first-post'}
{'_id': ObjectId('5d039611bf76b2ab4ed67949'), 'title': 'Another post', 'body': "Let's try another post", 'slug': 'another-post', 'extra-data': 'something'}
{'_id': ObjectId('5d039619bf76b2ab4ed6794a'), 'title': 'Blog Post III', 'body': 'The blog post is back in another summer blockbuster', 'slug': 'yet-another-post', 'author': 'John Smith'}
The find function is a bit like a SELECT statement in SQL; with no parameters, it’s like a SELECT with
no WHERE clause, and it just returns
a cursor that allows us to iterate over every document in the collection. Let’s try it with a more
restrictive query, and just print out one of the defined values in the object we inserted:
for post in client.blog.posts.find({"title": {"$eq": "Another post"}}):
    print(post["body"])
You’ll get something like this:
Let's try another post
MongoDB’s query language is very rich – you can see a list of the query operators here. We won’t go into any more detail here – there are many excellent MongoDB tutorials on the Internet, so if you google for “mongodb python tutorial” you’re bound to find something useful!
Now we’ve connected to a MongoDB database, and created some data, so let’s do something with that.
Connecting to the cluster from a Flask website
The next step is to connect to our cluster from a website’s code. We’ll use Flask for this – because it’s database-agnostic, it’s a better fit for MongoDB than Django, which is quite tied to the SQL model of representing data.
We’re also going to use a Flask extension called Flask-PyMongo to make our connections – the raw PyMongo package has a few problems with the way PythonAnywhere runs websites, and while there are ways around those (see the help page), the Flask extension handles everything smoothly for us. So, in your Bash console, exit IPython and run
pip3.7 install --user Flask-PyMongo
Once that’s done, let’s create a website: head over to the “Web” page inside PythonAnywhere, and create yourself a Python 3.7 Flask app.
When it’s been created, edit the flask_app.py file that was auto-generated for you, and replace
the contents with this:
from flask import Flask, render_template
from flask_pymongo import PyMongo

app = Flask(__name__)
app.config["MONGO_URI"] = "<the atlas connection string>"

mongo = PyMongo(app)

@app.route('/')
def index():
    return render_template("blog.html", posts=mongo.db.posts.find())

@app.route('/<post_slug>')
def item(post_slug):
    return render_template("blog.html", posts=mongo.db.posts.find({"slug": post_slug}))
…replacing <the atlas connection string> with the connection string as before, with one change –
the original connection string will have /test in it, like this:
mongodb+srv://admin:iW8qWskQGJcEpZdu9ZUt@cluster0-zakwe.mongodb.net/test?retryWrites=true&w=majority
That /test means “connect to the database called test on the cluster”. We’ve put our data into
a database called blog, so just replace the test with blog, so that it looks like this:
mongodb+srv://admin:iW8qWskQGJcEpZdu9ZUt@cluster0-zakwe.mongodb.net/blog?retryWrites=true&w=majority
All of the rest of the code in that file should be pretty obvious if you’re familiar with Flask – the MongoDB-specific stuff is very similar to the code we ran in a console earlier, and also to the way we would connect to MySQL via SQLAlchemy. The only really new thing is the abbreviated syntax for searching for an exact match:
mongo.db.posts.find({"slug": post_slug})
…is just a shorter way of saying this:
mongo.db.posts.find({"slug": {"$eq": post_slug}})
To go with this Flask app, we need a template file called blog.html in a new templates
subdirectory of the directory containing flask_app.py – here’s something basic that will work:
<html>
    <head>
        <meta charset="utf-8">
        <link rel="stylesheet" href="https://maxcdn.bootstrapcdn.com/bootstrap/3.3.5/css/bootstrap.min.css" integrity="sha512-dTfge/zgoMYpP7QbHy4gWMEGsbsdZeCXz7irItjcC3sPUFtf0kuFbDz/ixG7ArTxmDjLXDmezHubeNikyKGVyQ==" crossorigin="anonymous">
        <title>My blog</title>
    </head>

    <body>
        <div class="container">
            <div class="row">
                <h1><a href="/">My Blog</a></h1>
            </div>

            {% for post in posts %}
                <div class="row">
                    <h2><a href="/{{ post.slug }}">{{ post.title }}</a></h2>

                    <p>
                    {{ post.body }}
                    </p>
                </div>
            {% endfor %}

        </div>

    </body>
</html>
Note that there’s one simple difference to the way we reference the post document to how
we’d do it in Python code – in Python we have to say (for example) post["title"], while
dictionary lookups in a Flask template require us to use post.title.
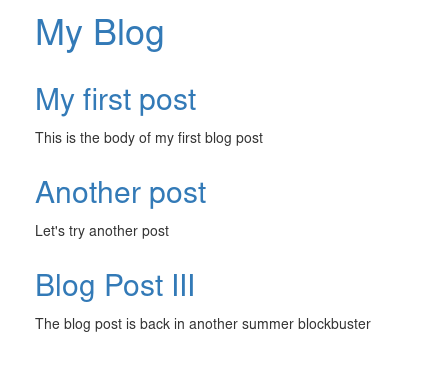
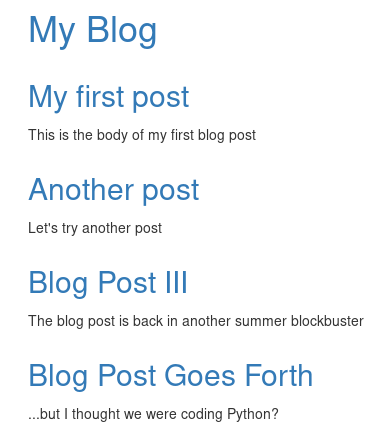
Once you’ve created that file, reload the website using the button on the “Web” page, and you should see a website with your blog posts on it:
Let’s add a new post: keep the tab showing your website open, but in another tab go to
your Bash console, start ipython3.7 again, connect
to the database, and add a new post:
import pymongo
client = pymongo.MongoClient("<the atlas connection string>")
db = client.blog
db.posts.insert_one({"title": "Blog Post Goes Forth", "body": "...but I thought we were coding Python?", "slug": "bad-blackadder-nerd-joke"})
Head back to the tab showing the site, and hit the browser’s refresh button – your new post will appear!
All done!
So now we have a working super-simple blog running on PythonAnywhere, backed by an Atlas MongoDB cluster.
The one remaining issue is that the whitelist we specified is a little broad. If someone gets hold of your MongoDB username and password, they can access the database. It’s possible to set things up so that you have an initially-empty whitelist, and then every time you run your code, it automatically whitelists the IP address it’s running on using the Atlas API – that’s a slightly more advanced topic, though, so if you want to learn about that, head over to our MongoDB help page.
We hope this post has been useful – if you have any questions or comments, please leave them below. Also, if there are other things you’d like to connect to from PythonAnywhere that you think could benefit from having a blog post explaining how to do it, please do let us know!